A garlic press is one of those small kitchen tools that can make fresh garlic preparation considerably faster. Instead of peeling and finely chopping each clove with a knife, you can press garlic directly into a bowl, pan, or cutting board to produce a fine, ready-to-use mince.
From a chef’s perspective, the real advantage is consistency: pressed garlic has a fine texture that works particularly well in sauces, dressings, marinades, garlic butter, and other recipes where you want garlic distributed evenly. Pressing also breaks down more garlic cells than simple slicing, which can produce a stronger, more pronounced garlic flavor.
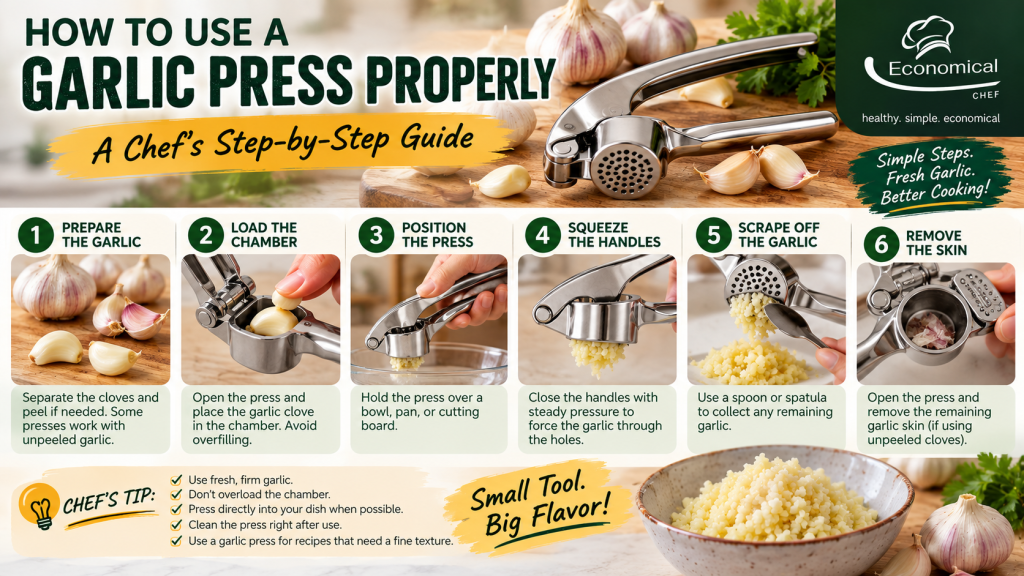
What You Need
Before you start, you only need:
- A garlic press (see our Guide to the Best Garlic Presses in 2026 for your options)
- Fresh garlic cloves
- A small bowl, cutting board, or the pan you’re cooking in
- A spoon or small spatula for scraping, if necessary
- A cleaning brush or the press’s built-in cleaner, if available
The first thing I recommend is checking your particular press. Some models are designed to handle unpeeled garlic, while others work better with peeled cloves. Never assume that every garlic press can handle the skin.
How to Use a Garlic Press Step by Step
1. Select and Separate the Garlic Cloves
Start with fresh garlic and separate the cloves from the bulb. Remove any loose outer skin, dirt, or damaged portions.
At this stage, you have two choices. If your garlic press is specifically designed for unpeeled cloves, you can place the clove into the chamber with the skin on. Many modern presses are designed to separate the papery skin from the garlic as it passes through the holes.
If the manufacturer recommends peeling first, remove the skin before pressing.
2. Open the Press and Load the Chamber
Open the handles completely and place the garlic clove inside the pressing chamber.
Don’t automatically fill the chamber to its maximum capacity. If the cloves are large or the press has a relatively small chamber, overfilling can make the handles harder to close and may reduce the efficiency of the press.
For multiple cloves, follow the manufacturer’s capacity recommendation.
3. Position the Press Over Your Food
This is one of my favorite advantages of using a garlic press: you can often press the garlic directly into the dish.
Hold the press over your mixing bowl, saucepan, skillet, or cutting board. Make sure the tool is positioned securely before squeezing.
For a recipe such as pasta sauce or sautéed vegetables, I usually press the garlic directly into the pan when appropriate. For dressings, marinades, or garlic butter, pressing into a bowl makes it easier to combine the ingredients.
4. Squeeze the Handles With Steady Pressure
Close the handles and apply firm, controlled pressure.
You don’t need to jerk or repeatedly squeeze the handles. A smooth, steady motion usually gives better control and helps force the garlic through the pressing plate.
If the press requires excessive force, stop and check the chamber. You may have overloaded it, the clove may be unusually large, or garlic residue may be blocking the holes.
An ergonomic handle and good leverage can make a significant difference if you’re pressing several cloves at once.
5. Scrape Off the Pressed Garlic
Once the garlic has passed through the holes, check the underside and sides of the pressing plate.
A small amount of garlic may remain on the press. Use a spoon, spatula, or the edge of another utensil to collect it rather than wasting it.
Some models are designed to maximize garlic extraction, while others leave more pulp behind. This is one reason I pay attention to the pressing mechanism when evaluating garlic presses.
6. Remove the Garlic Skin
If you used an unpeeled clove, open the chamber and remove the remaining papery skin.
This is where an unpeeled-garlic press can save considerable prep time. Instead of peeling every clove by hand, the press separates the skin while the usable garlic is forced through the holes. However, this feature varies by model, so check the manufacturer’s instructions.
How to Get Better Results From a Garlic Press
Don’t Overfill the Chamber
More garlic isn’t always better. An overloaded chamber can require more hand pressure and may leave more garlic behind.
For consistent results, use the capacity recommended for your particular model.
Use Fresh Garlic
Fresh, firm cloves generally give better results than old, dried-out garlic. If a clove has become soft, sprouted, or excessively dry, I would inspect it carefully and remove any undesirable portions before pressing.
Match the Garlic Texture to the Recipe
Pressed garlic produces a very fine texture, which isn’t ideal for every dish.
I prefer pressed garlic when I want it to blend into:
- Sauces and gravies
- Salad dressings
- Marinades
- Garlic butter
- Aioli and mayonnaise
- Mashed potatoes
- Garlic bread
- Stir-fry sauces
For dishes where I want larger pieces of garlic with more texture, I would use a chef’s knife instead.
Use the Right Amount of Pressure
Don’t try to win a strength contest with your garlic press. If you’re having to strain excessively, something is probably wrong.
A well-designed press should use leverage to do most of the work. If the tool repeatedly feels difficult to squeeze, consider using fewer cloves per batch or choosing a model with more comfortable handles and better leverage.
Should You Peel Garlic Before Using a Garlic Press?
Not always. This is one of the most common questions about garlic presses.
If the manufacturer specifically says the press can handle unpeeled cloves, you can usually skip peeling. This is one of the main conveniences of a good garlic crusher. Epicurious demonstrated the technique using an unpeeled clove and found that the papery skin remained in the chamber while the minced garlic passed through. (Epicurious)
However, peeling first can still make sense if you’re using a press that isn’t designed for unpeeled garlic or if you want to minimize clogging and cleanup. Recent testing also suggests that some presses handle peeled cloves more cleanly, so the design of the individual tool matters.
How to Clean a Garlic Press After Use
Clean the press immediately after pressing the garlic. Dried garlic pulp is much more annoying to remove than fresh residue.
First, open the press and remove any remaining garlic skin. Rinse the pressing chamber under running water. If garlic is trapped in the small holes, use the press’s built-in cleaner, a small cleaning brush, or another appropriate cleaning tool.
If the manufacturer says the press is dishwasher safe, you can use the dishwasher for a more thorough cleaning. Removable baskets and flip-out pressing plates are particularly convenient because they give you better access to areas where garlic can become trapped.
Learn how to clean a garlic press properly and remove stuck garlic, residue, and odors with these easy chef-approved tips.
Chef’s Tips for Using a Garlic Press
From a practical kitchen perspective, these small habits make the tool much easier to live with:
- Check whether your press accepts unpeeled cloves before skipping the peeling step.
- Don’t overload the chamber just to save one pressing cycle.
- Press directly over the pan or bowl when the recipe allows it.
- Scrape off remaining garlic rather than leaving usable pulp behind.
- Rinse immediately instead of allowing garlic to dry in the holes.
- Use pressed garlic for recipes where a fine texture is desirable.
- Choose a different preparation method when you need larger, more textured pieces.
Is Pressed Garlic Stronger Than Chopped Garlic?
It can taste more intense because pressing causes substantial cell damage and releases more of garlic’s pungent compounds. Recent comparative testing of different garlic preparation methods found that pressing and grating produced some of the most assertive garlic flavors, while less aggressive methods such as slicing or chopping produced milder profiles.
That’s useful to remember when cooking. If a recipe calls for chopped garlic but you substitute pressed garlic, you may want to adjust the quantity depending on the flavor you’re aiming for.
Final Chef’s Take
A garlic press isn’t a replacement for a chef’s knife in every situation, but it is an excellent time-saving garlic preparation tool when you want a fine, consistent texture with minimal handling. The biggest benefits are convenience, speed, and uniformity—especially when preparing several cloves for sauces, dressings, marinades, and other garlic-forward recipes.
If you’re considering buying one, focus on comfortable leverage, chamber capacity, pressing efficiency, durability, and cleaning rather than simply choosing the cheapest model. For more detailed recommendations, see our guide to the best garlic press models, where we compare different designs for everyday kitchen use.