A bottom loading water dispenser is one of the most convenient ways to enjoy clean drinking water at home or in the office. However, even the best models require regular cleaning to keep the water tasting fresh and to prevent mineral buildup, mold, and bacteria from developing inside the machine. From my experience as a professional chef, maintaining food-contact equipment is just as important as choosing high-quality appliances. A clean water dispenser not only improves hygiene but also helps extend the lifespan of the unit.
In this step-by-step guide, I’ll walk you through how to safely clean and sanitize a bottom load water cooler using simple household supplies. Whether your dispenser has a self-cleaning function or not, these maintenance tips will help keep it performing at its best.
Why You Should Clean Your Water Dispenser Regularly
Although bottled water is regulated for safety, the dispenser itself still needs routine cleaning because the dispensing nozzles, drip tray, and internal water-contact surfaces can accumulate bacteria, mineral deposits, and residue over time. The U.S. Food and Drug Administration (FDA) and the U.S. Centers for Disease Control and Prevention (CDC) both emphasize the importance of proper sanitation and handling of bottled drinking water equipment to maintain water quality.
Regular cleaning helps:
- Improve the taste and freshness of drinking water
- Reduce the risk of bacterial contamination
- Prevent mold and mildew growth
- Extend the life of your water dispenser
- Keep your kitchen or office more hygienic
What You’ll Need
Before you begin, gather these supplies:
- Mild dish soap
- Warm water
- Soft microfiber cloth
- Soft bottle brush or small cleaning brush
- Food-safe sanitizer or a diluted unscented bleach solution (follow your manufacturer’s recommendations)
- Clean towel
- Disposable gloves (optional)
Chef’s Tip: Avoid abrasive scrubbers or harsh chemicals, as they may scratch the dispenser or leave behind unwanted residues.
A Step-by-Step Guide How to Clean It
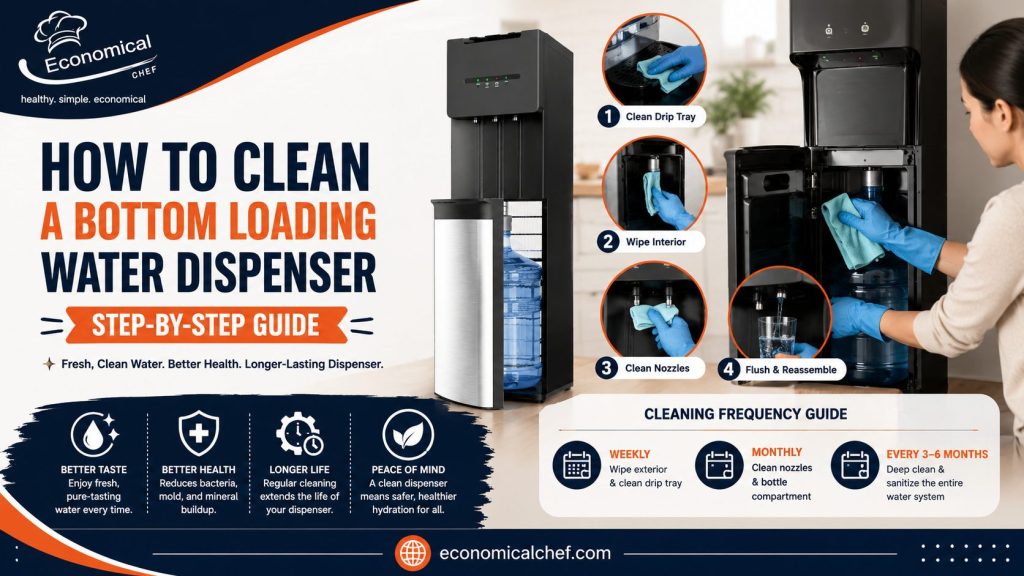
Step 1: Turn Off and Unplug the Water Dispenser
For safety, switch off both the heating and cooling functions before unplugging the unit. Allow the hot water tank to cool completely before cleaning to reduce the risk of burns.
Step 2: Remove the Water Bottle
Open the bottom cabinet and carefully disconnect the water bottle from the intake hose.
If any water remains in the bottle, set it aside in a clean location while you clean the dispenser.
Step 3: Empty the Reservoir and Drip Tray
Drain any remaining water according to your manufacturer’s instructions.
Then:
- Remove the drip tray.
- Wash it with warm soapy water.
- Rinse thoroughly.
- Allow it to air dry.
The drip tray is one of the areas that collects the most spills, so cleaning it regularly helps prevent odors and mold.
Step 4: Clean the Interior Components
Using a soft cloth dampened with warm soapy water, wipe down all accessible interior surfaces, including:
- Bottle compartment
- Cabinet walls
- Water bottle support area
- Door seals
For hard-to-reach areas, use a soft cleaning brush. Avoid allowing excess water to enter electrical components.
Step 5: Sanitize the Water System
After cleaning, sanitize the dispenser according to the manufacturer’s instructions. If your model recommends using a diluted unscented bleach solution, prepare it exactly as directed and flush the system thoroughly afterward. Based on U.S. Centers for Disease Control and Prevention (CDC) on Safe Water Storage, it recommends using properly diluted unscented bleach solutions when sanitizing water-contact containers and emphasizes rinsing or air-drying as appropriate after sanitation.
If your dispenser includes a UV self-cleaning or automatic sanitizing feature, activate it after completing the manual cleaning process. Remember that self-cleaning systems help reduce maintenance but do not eliminate the need for periodic manual cleaning.
Step 6: Wipe the Dispensing Nozzles
The dispensing spouts are among the most frequently touched parts of the machine. Use a clean cloth or disinfecting wipe approved by the manufacturer to clean:
- Hot water nozzle
- Cold water nozzle
- Room-temperature nozzle (if equipped)
- Pay special attention to dried water spots or mineral deposits around the nozzles.
Step 7: Reassemble and Flush
Once everything is clean:
- Reinstall the drip tray.
- Reconnect the water bottle.
- Plug the dispenser back in.
- Turn on the heating and cooling switches.
- Dispense several cups of water from each faucet before drinking.
This final flush helps remove any remaining cleaning solution from the internal water lines.
Common Cleaning Mistakes to Avoid
To keep your water dispenser for home in excellent condition, avoid these common mistakes:
- Skipping routine cleaning for several months
- Using abrasive cleaners that damage surfaces
- Forgetting to clean the dispensing nozzles
- Reinstalling wet parts before they have dried completely
- Ignoring the manufacturer’s cleaning instructions
- Assuming a self-cleaning model never requires manual maintenance
How Often Should You Clean a Bottom Loading Water Dispenser?
As a general guideline:
- Weekly: Wipe exterior surfaces and clean the drip tray.
- Monthly: Clean the dispensing nozzles and bottle compartment.
- Every 3–6 months: Perform a complete cleaning and sanitizing of the internal water system, or follow the maintenance schedule recommended by the manufacturer.
If the dispenser is used heavily in an office or shared kitchen, more frequent cleaning may be beneficial.
Final Thoughts
Cleaning a bottom loading water dispenser doesn’t take long, but it makes a significant difference in water quality, appliance performance, and overall hygiene. With regular maintenance, your dispenser can continue delivering fresh, great-tasting water while helping reduce unnecessary wear on internal components.
If you’re still looking for the right model, don’t miss our Best Bottom Loading Water Dispensers in 2026 roundup, where we compare the top-rated options based on real-world performance, durability, ease of use, and overall value. Whether you need a water dispenser for home or office, our expert reviews can help you choose the model that best fits your needs.