Copper naturally darkens and develops tarnish as it reacts with air, moisture, and other environmental factors. This is normal and doesn’t necessarily mean the copper is dirty or damaged.
If you prefer the original bright copper appearance, you can remove the tarnish with a few simple steps. This guide focuses specifically on removing tarnish from copper bottles, dispensers, pitchers, mugs, cookware, and decorative copper items—not routine cleaning.
Important: If you’re looking for everyday hygiene and washing instructions, see our How to Clean a Copper Water Bottle Properly guide. This article is specifically about tarnish removal and restoring copper’s appearance.
What Is Copper Tarnish?
Copper tarnish is the result of chemical reactions between copper and its surroundings. Over time, the surface can change from bright reddish-orange to darker brown, black, or eventually develop a greenish patina.
Tarnish is primarily an appearance issue, so you don’t necessarily have to remove it.
If you like the aged look of copper, you can leave the patina alone. If you want your copper bottle, pitcher, dispenser, or cookware to look bright and polished again, tarnish removal can restore much of its original appearance.
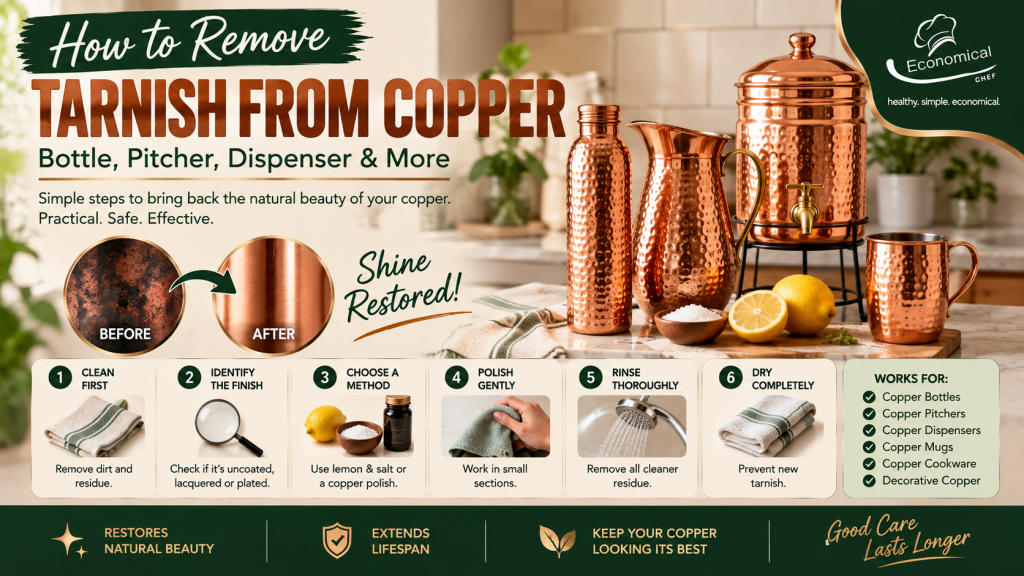
Before You Start: Check the Copper Finish
Before applying any cleaner, determine what you’re working with.
Bare or uncoated copper
This is the easiest type to polish. Traditional copper-cleaning methods can generally be used on the exterior.
Lacquered or clear-coated copper
Be careful. A clear coating is designed to prevent oxidation, and abrasive cleaning can damage or remove it.
Copper-plated products
Don’t polish aggressively. Excessive rubbing can eventually wear through a thin copper layer and expose the underlying metal.
Hammered copper
Use extra care around the textured surface. Aggressive scrubbing can make the finish uneven.
Copper with a lined interior
Treat the inside differently from the outside. Do not assume that a tarnish-removal method suitable for bare exterior copper is suitable for a food- or water-contact lining.
How to Remove Tarnish From Copper Step by Step
Step 1: Remove Dirt and Residue First
Don’t polish a visibly dirty copper surface immediately.
For a copper bottle, pitcher, dispenser, mug, or cookware:
- Empty the item.
- Wash away grease, dust, or food residue.
- Rinse thoroughly.
- Dry the surface.
This separates ordinary cleaning from tarnish removal.
For everyday cleaning instructions, our copper water bottle cleaning guide covers the routine process.
Step 2: Test a Small Area
Before treating the entire surface, choose a small inconspicuous section.
Apply your chosen tarnish-removal method and check the result.
This is particularly important for:
- Hammered copper
- Lacquered copper
- Copper-plated products
- Decorative finishes
- Older or antique copper
If the finish changes unexpectedly, stop before treating the rest of the item.
Step 3: Try Lemon and Salt for Bare Exterior Copper
For uncoated exterior copper, lemon and salt is one of the simplest traditional methods.
What you need:
- Half a lemon
- Table salt
- Soft cloth
- Clean water
How to do it:
- Sprinkle a small amount of salt onto the cut side of the lemon.
- Gently rub the lemon over the tarnished copper.
- Work in small sections.
- Avoid aggressive pressure.
- Continue until the darker oxidation begins to lift.
- Rinse the surface thoroughly.
- Dry immediately with a soft cloth.
The combination of the acidic lemon and mild mechanical action from the salt can help loosen surface tarnish.
However, I would use this method primarily on the exterior of copper drinkware.
The U.S. Food and Drug Administration restricts copper and copper alloys from contact with foods below pH 6, including acidic foods such as fruit juice and vinegar.
For that reason, don’t treat an unlined copper bottle as though lemon juice belongs inside it.
For more information, see our guide on whether you can put lemon water in a copper bottle.
Step 4: Use a Vinegar-and-Salt Method for Stubborn Exterior Tarnish
If lemon isn’t available, vinegar and salt can be another traditional option for bare exterior copper.
Mix a small amount of white vinegar with salt to create a thin cleaning paste.
Then:
- Apply a small amount to the tarnished surface.
- Rub gently with a soft cloth.
- Work section by section.
- Rinse thoroughly with clean water.
- Dry immediately.
Don’t leave the acidic mixture sitting on copper for an extended period.
And again, don’t automatically use this mixture inside a copper drinking vessel.
Step 5: Use a Copper Polish for Heavy Tarnish
For severely tarnished copper, a commercial copper cleaner may be easier and more consistent.
Choose a product specifically intended for the type of copper item you’re cleaning.
Before using it, check whether the product is suitable for:
- Food-contact surfaces
- Drinkware
- Cookware
- Bare copper
- Coated copper
- Plated copper
This distinction matters. A polish designed for a decorative copper ornament isn’t automatically appropriate for the interior of a drinking vessel.
Step 6: Treat Hammered Copper Gently
Hammered copper can be particularly attractive, but its textured surface makes aggressive polishing a bad idea.
Instead:
- Apply your chosen cleaner gently.
- Use a soft cloth.
- Follow the direction of the hammered texture where practical.
- Avoid steel wool and hard abrasive pads.
- Rinse thoroughly.
- Dry immediately.
Don’t try to make every indentation perfectly bright. Some natural variation is part of the character of hammered copper.
Step 7: Rinse Away All Cleaner
This is especially important for copper products used with food or drinking water.
After removing tarnish:
- Rinse thoroughly with clean water.
- Don’t leave acidic cleaner or polish residue on the surface.
- Pay attention to seams, handles, threads, spouts, and textured areas.
- Follow any manufacturer-specific rinsing instructions.
For a copper bottle or pitcher, I would be particularly conservative with the interior.
Step 8: Dry the Copper Completely
Dry the copper immediately with a soft, clean cloth.
Don’t leave a freshly polished copper item wet.
Once dry, inspect the surface under good lighting. If small areas remain tarnished, repeat the treatment rather than using significantly more pressure.
How to Remove Black Tarnish From Copper
Black or very dark copper doesn’t necessarily require an aggressive cleaner.
Start with the least abrasive approach:
- Clean away surface residue.
- Test your chosen tarnish remover.
- Work on a small area.
- Rub gently.
- Rinse.
- Dry.
- Repeat if necessary.
If the copper remains heavily blackened, a copper-specific commercial polish may be more appropriate than increasingly aggressive household scrubbing.
Avoid steel wool. It can scratch copper and leave permanent-looking marks on polished surfaces.
What About Green Tarnish or Patina?
Green or blue-green discoloration is a form of copper patina.
You don’t necessarily need to remove it.
For decorative copper, some people actually prefer the aged appearance.
If you want the original copper color back, use a method appropriate for the particular finish and test it first.
For copper cookware or drinkware, pay particular attention to whether the discoloration is simply surface patina or whether there is flaking, powdery buildup, peeling coating, or an unknown material.
If you’re unsure what you’re looking at, don’t aggressively polish it away.
How to Remove Tarnish From a Copper Water Bottle
If you own a copper water bottle and have tarnish to remove, this is the practical process for a bare copper exterior:
- Empty the bottle.
- Clean away normal residue.
- Dry the outside.
- Apply lemon and salt or an appropriate copper cleaner to the exterior.
- Rub gently with a soft cloth.
- Rinse thoroughly.
- Dry immediately.
- Leave the bottle open until completely dry.
What about the inside?
This is where I recommend more caution.
The interior directly contacts your drinking water. Don’t assume that a traditional acidic tarnish-removal method is appropriate for it.
If the inside is dark but otherwise intact, check the manufacturer’s care instructions before attempting to polish it.
If you see flaking, peeling, powdery green material, or damaged lining, stop using the bottle until you know what the material is and how it should be treated.
How to Remove Tarnish From a Copper Water Dispenser or Pitcher
Large copper dispensers and pitchers can be treated much like copper cookware, but they have more surface area and often include additional components.
Exterior
- Remove the lid, tap, stand, or other removable components if appropriate.
- Clean away dust and residue.
- Apply your chosen tarnish treatment to a small section.
- Work across the exterior using a soft cloth.
- Rinse thoroughly.
- Dry completely.
Around the tap or spout
Don’t allow cleaning paste to remain trapped around:
- Threads
- Faucet connections
- Seams
- Rubber seals
- Spout openings
These areas need particularly thorough rinsing.
Interior
If the dispenser or pitcher is intended for drinking water, follow the manufacturer’s instructions for the water-contact surface rather than automatically applying an acidic tarnish remover.
How to Remove Tarnish From Copper Cookware
For bare exterior copper cookware:
- Remove food residue.
- Wash and dry the cookware.
- Apply an appropriate copper cleaner.
- Rub gently with a soft cloth.
- Rinse thoroughly.
- Dry immediately.
For cookware with a tin, stainless-steel, or other interior lining, don’t use copper polish on the cooking surface unless the manufacturer specifically allows it.
The interior lining and exterior copper have different care requirements.
What Not to Use on Tarnished Copper
Avoid trying to remove tarnish with increasingly aggressive tools.
Don’t use:
- ❌ Steel wool
- ❌ Heavy-duty abrasive pads
- ❌ Sandpaper
- ❌ Oven cleaner
- ❌ Strong household chemicals
- ❌ Undiluted harsh acids
- ❌ Abrasive powders unless specifically recommended
- ❌ Aggressive polishing on copper plating
The goal is to remove oxidation—not remove the copper itself.
How to Prevent Copper From Tarnishing Quickly
You can’t completely stop bare copper from changing color, but you can slow the process.
- Keep copper dry: Moisture accelerates surface changes.
- Handle polished copper with clean hands: Finger oils can contribute to uneven discoloration.
- Dry after washing: Don’t allow water droplets to evaporate naturally on a polished surface.
- Store it in a dry location: Avoid prolonged exposure to humid environments.
- Consider a protective coating: For decorative copper, an appropriate clear coating can help preserve the bright finish. Only use a coating specifically designed for the intended application.
- Don’t polish unnecessarily: Every polishing session removes a tiny amount of surface material. Tarnish removal should be occasional, not a daily cleaning routine.
Tarnish Removal vs. Regular Copper Cleaning
This distinction is important for avoiding confusion between your Economical Chef articles.
| Task | What you’re trying to remove | Best approach |
|---|---|---|
| Routine cleaning | Water residue, dust, food residue, oils | Mild soap, water, gentle washing |
| Tarnish removal | Oxidation and dark discoloration | Appropriate copper polish or gentle tarnish treatment |
| Patina removal | Brown/green/blue surface oxidation | More intensive polishing |
| Deep restoration | Heavy oxidation or damaged finish | Product-specific restoration |
| Acidic beverage issue | Potential copper reaction/leaching | Avoid acidic drinks in unlined copper |
When You Should Not Try to Remove the Tarnish Yourself
Stop and check the manufacturer or a professional restorer if you notice:
- Peeling or flaking coating
- Exposed base metal on plated copper
- Deep corrosion
- Cracks or holes
- Unknown interior lining
- Antique or valuable copper
- Heavy green powdery deposits
- Soldered areas that appear damaged
A little tarnish is easy to fix. Damaging the underlying finish is much harder to reverse.
My Practical Chef’s Method
For everyday copper products, I keep the process simple:
Clean → dry → identify the finish → test → gently remove tarnish → rinse → dry.
For a copper bottle, pitcher, or dispenser, I would concentrate most of the polishing effort on the exterior. The inside is a food- or water-contact surface, so its intended construction and manufacturer instructions matter more than making it look perfectly shiny.
And remember: tarnish isn’t the same thing as dirt. If you like the natural character of aged copper, there’s no requirement to keep it mirror-bright.
Final Takeaway
Removing tarnish from copper doesn’t require aggressive scrubbing. Start with a clean, dry surface, identify the finish, test a small area, and use a gentle copper-appropriate treatment. Traditional lemon-and-salt or vinegar-and-salt methods can work on suitable bare exterior copper, while commercial copper polish is useful for heavier tarnish.
For copper bottles, pitchers, and dispensers used with drinking water, be more conservative with the interior. Acidic substances can react with copper, and the FDA Food Code specifically restricts copper and copper alloys from contact with foods below pH 6.
2 thoughts on “How to Remove Tarnish From Copper: A Practical Step-by-Step Guide”